The Tunnel Without Walls
Scenario: A memory dump from a connected Linux machine reveals covert network connections, fake services, and unusual redirects. Holmes investigates further to uncover how the attacker is manipulating the entire network!
Executive summary
An attacke gained SSH access to a Debian host ( 5.10.0-35-amd64) and used an interactive shell (PID 13608) to perform reconnaissance, credential theft, and network manipulation. The attacker installed a malicious kernel module and replaced network services (DNS/DHCP) with a dnsmasq instance to impersonate the entire local network and perform a supply-chain redirect that delivered a trojanized Windows updater to a workstation.
This is the Part of the HTB CTF. If you want to follow along and practice by yourself, you can find related zip file here: Challenge Link
And Questions are availble in the Table of Content! Happy Hunting :)
Key findings
- Host kernel: 5.10.0-35-amd64.
- Attacker interactive shell PID: 13608.
- Escalated user credentials recovered: jm:WATSON0.
- Malicious payload installed from Pastebin; rootkit module stored at
/usr/lib/modules/5.10.0-35-amd64/kernel/lib/Nullincrevenge.ko. - Claimed author email embedded in the module: i-am-the@network.now
- Rogue network package installed: dnsmasq (process PID 38687).
- Compromised workstation hostname: Parallax-5-WS-3.
- Portal user on that workstation: mike.sullivan.
- The trojanized updater was downloaded from: /win10/update/CogSoftware/AetherDesk-v74-77.exe.
- Attacker redirected official updates domain updates.cogwork-1.net to 13.62.49.86:7477, where the malicious file was served.
Report in PDF
Table of contents
- What is the Linux kernel version of the provided image? (string)
- The attacker connected over SSH and executed initial reconnaissance commands. What is the PID of the shell they used? (number)
- After the initial information gathering, the attacker authenticated as a different user to escalate privileges. Identify and submit that user’s credentials. (user:password)
- The attacker downloaded and executed code from Pastebin to install a rootkit. What is the full path of the malicious file? (/path/filename.ext)
- What is the email account of the alleged author of the malicious file? ( user@example.com )
- The next step in the attack involved issuing commands to modify the network settings and installing a new package. What is the name and PID of the package? (package name,PID)
- Clearly, the attacker’s goal is to impersonate the entire network. One workstation was already tricked and got its new malicious network configuration. What is the workstation’s hostname?
- After receiving the new malicious network configuration, the user accessed the City of CogWork-1 internal portal from this workstation. What is their username? (string)
- Finally, the user updated a software to the latest version, as suggested on the internal portal, and fell victim to a supply chain attack. From which Web endpoint was the update downloaded?
- To perform this attack, the attacker redirected the original update domain to a malicious one. Identify the original domain and the final redirect IP address and port. (domain,IP:port)
1. What is the Linux kernel version of the provided image? (string)
Answer (short):
5.10.0-35-amd64
mindset:
First, we need to know what kind of memory image this is
command
vol -f .\memdump.mem banners.Banners
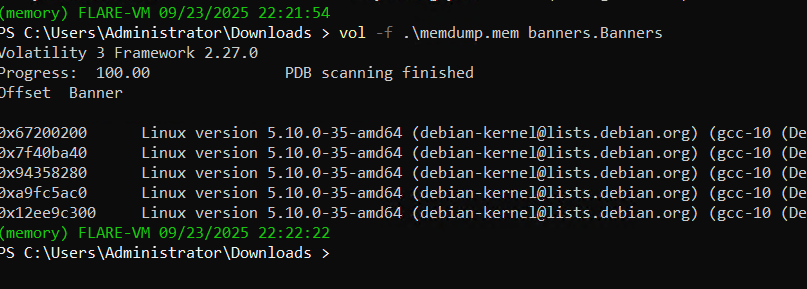
now we should gather basic information around this memory file
making vul3 running
and just when i thought it’ll be easy, it bangs with error
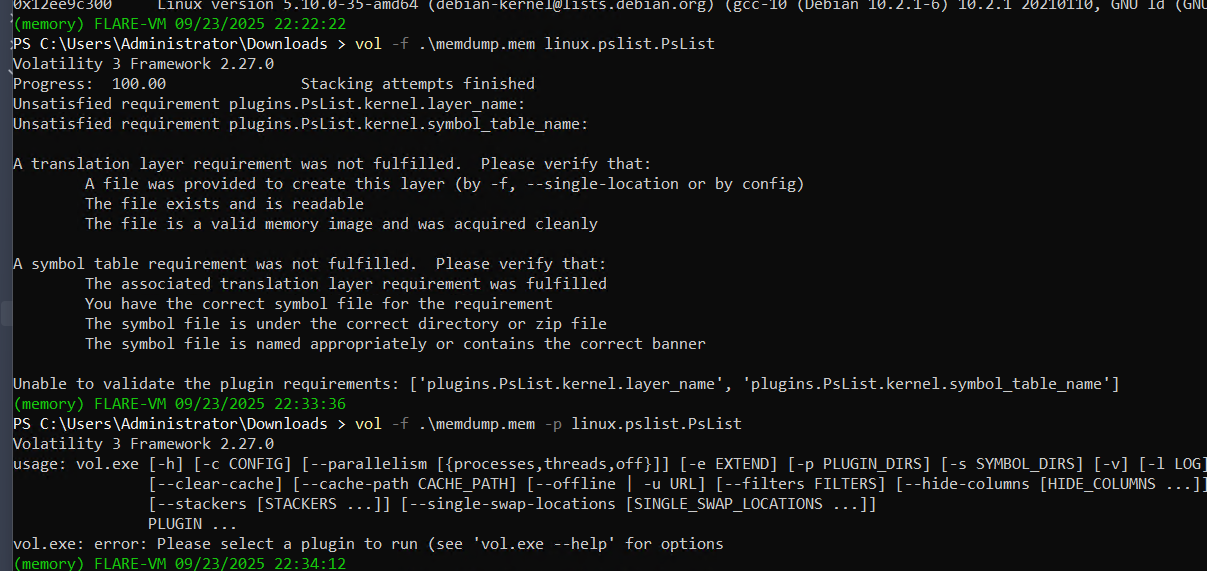
same as vol2, where we used to select profile with the command. Here we have symbols. And I checked on the official repo, they don’t have the symbol table for our Debian 5 version
but then I searched and found some ways to install the needed symbol and got this repo: by Abyss-W4tcher
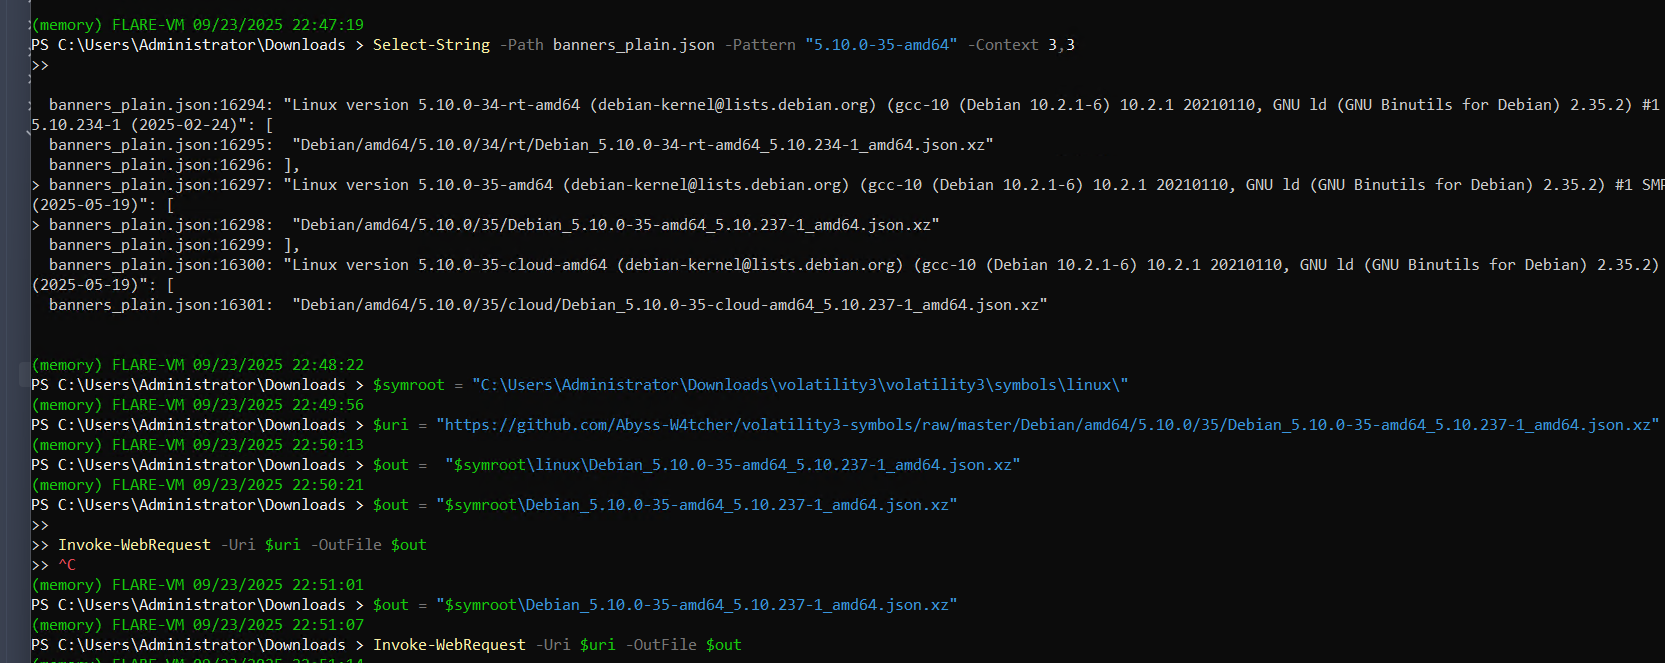
I followed his steps and downloaded banner file to match
curl https://raw.githubusercontent.com/Abyss-W4tcher/volatility3-symbols/master/banners/banners_plain.json
Select-String -Path banners_plain.json -Pattern "5.10.0-35-amd64" -Context 3,3
and we get the match!!
rest is we just have to install our required symbol
but first make the folder named linux at \volatility3\volatility3\symbols\
$symroot = "C:\Users\Administrator\Downloads\volatility3\volatility3\symbols\linux\"

$uri = "https://github.com/Abyss-W4tcher/volatility3-symbols/raw/master/Debian/amd64/5.10.0/35/Debian_5.10.0-35-amd64_5.10.237-1_amd64.json.xz"

$out = "$symroot\Debian_5.10.0-35-amd64_5.10.237-1_amd64.json.xz"

Invoke-WebRequest -Uri $uri -OutFile $out
and that’s it, now we can run the vol3 with out symbol
vol -f .\memdump.mem -s "C:\Users\Administrator\Downloads\volatility3\volatility3\symbols" linux.pslist
2. The attacker connected over SSH and executed initial reconnaissance commands. What is the PID of the shell they used? (number)
Answer (short):
13608
mindset:
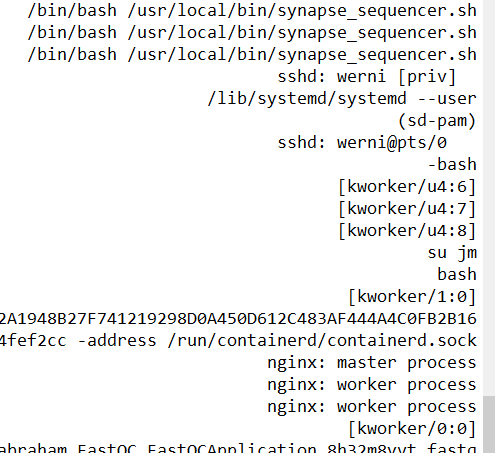
After loading the correct symbol table, I used the linux.psaux plugin to list all processes along with their command lines. SSH logins typically follow a pattern:
- An sshd process running in privileged mode (
[priv]). - A child sshd process tied to a specific user session (here
werni@pts/0). - Finally, a bash process started by that sshd session - this is the attacker’s interactive shell.
13585 sshd sshd: werni [priv] 13607 sshd sshd: werni@pts/0 13608 bash -bash
command
$symbol = C:\Users\Administrator\Downloads\volatility3\volatility3\symbols

vol -f .\memdump.mem -s $symbol -r pretty linux.psaux > .\Outputs\psaux2.txt

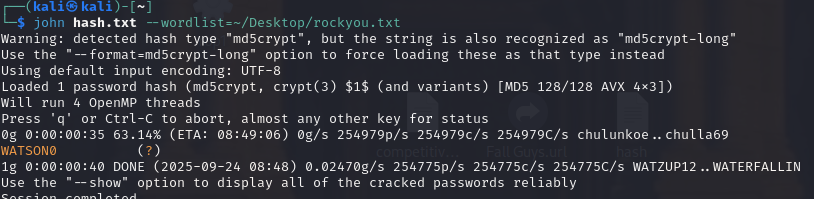
3. After the initial information gathering, the attacker authenticated as a different user to escalate privileges. Identify and submit that user’s credentials. (user:password)
Answer (short):
jm:WATSON0
mindset:
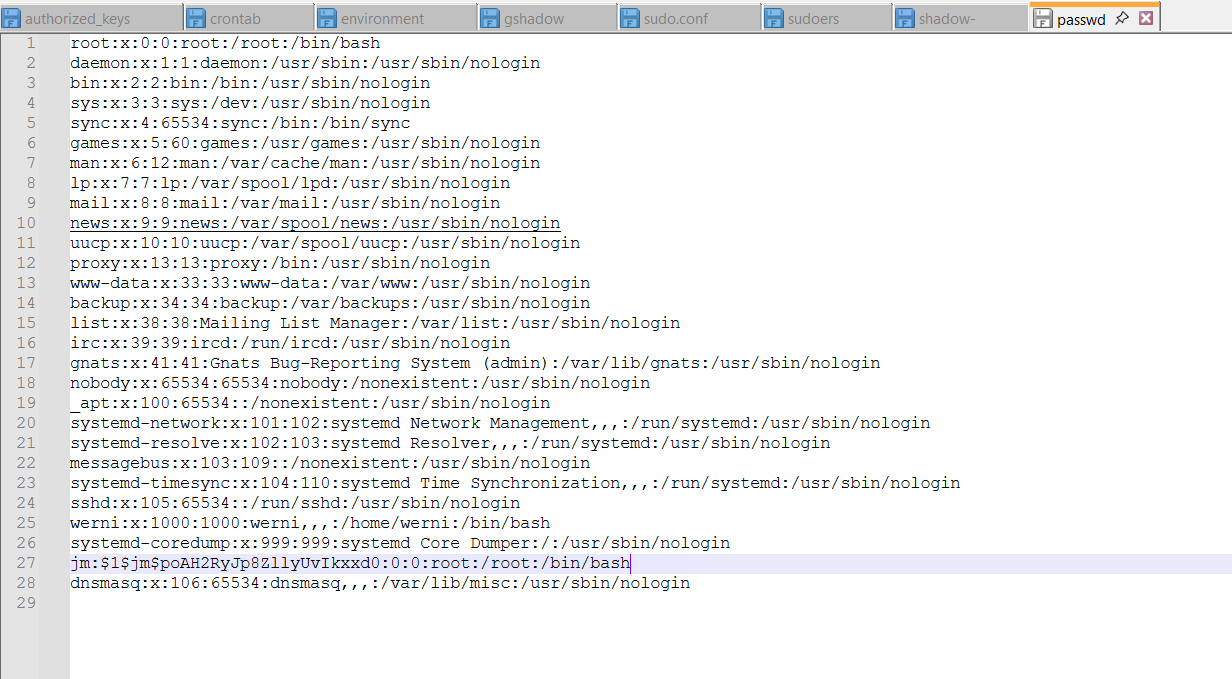
From the output we can see that attacker then switch the user to jm. So we know that other authenticated user is jm
I have used many different things to find this. So we can get this by two ways
- dump process memory of 13608 pid
- dump whole file system and check for shadow and passwd file
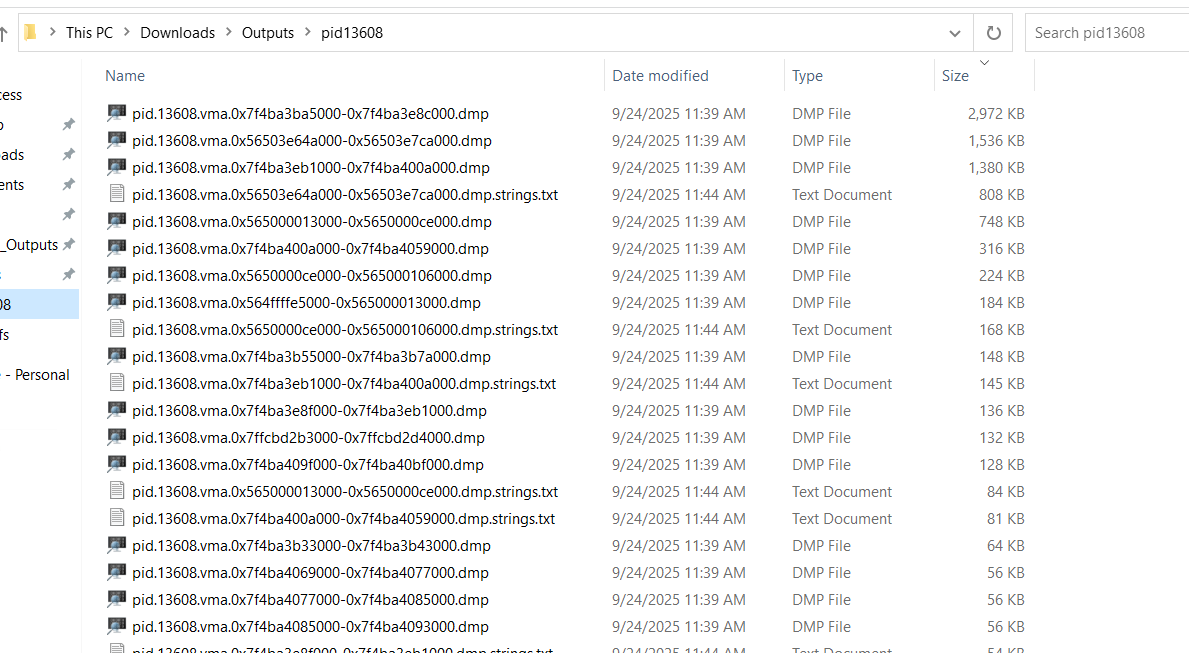
i did first method before but there are many dump files, overwhelming. Couldn’t find answer from it but it’s there
vol -f ..\..\memdump.mem -s $symbol linux.proc.Maps --pid 13608 --dump

$strings = "C:\Users\Administrator\Downloads\strings64.exe"

Get-ChildItem .\Outputs\pid13608 | Sort-Object Length -Descending | Select-Object Length,Name

Get-ChildItem -Filter *.dmp | ForEach-Object {..\..\strings.exe -n 4 $_.FullName > "$($_.FullName).strings.txt"}
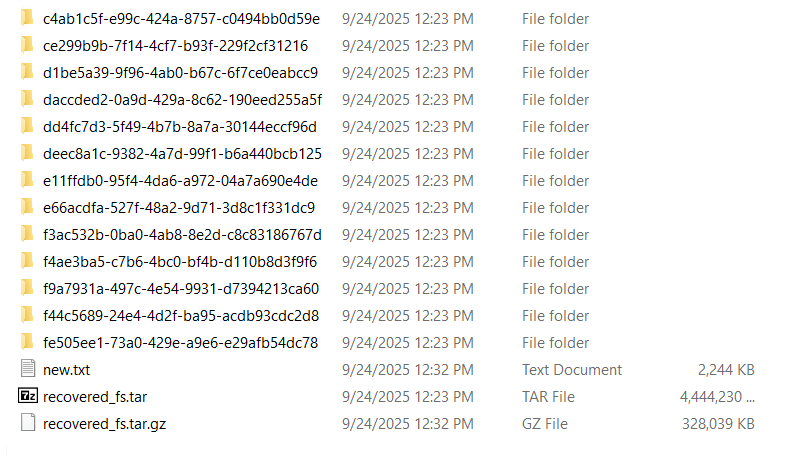
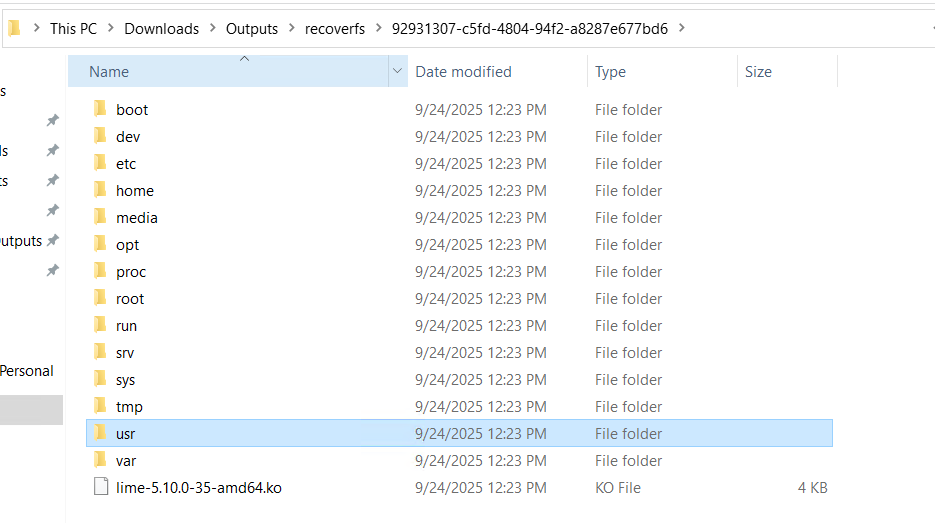
then I moved to dumping whole file system. This will give lot of warnings and error but its fine you’ll end up having a tar file which you have to extract twice with 7-zip and in one of the file, you will get the whole file system
which you can check with size of each folder
vol -f ..\..\memdump.mem -s $symbol -r pretty linux.pagecache.RecoverFs > new.txt
then we can check passwd file and find the hash and it’s MD5 hash!
just crack with john
4. The attacker downloaded and executed code from Pastebin to install a rootkit. What is the full path of the malicious file? (/path/filename.ext)
Answer (short):/usr/lib/modules/5.10.0-35-amd64/kernel/lib/Nullincrevenge.ko
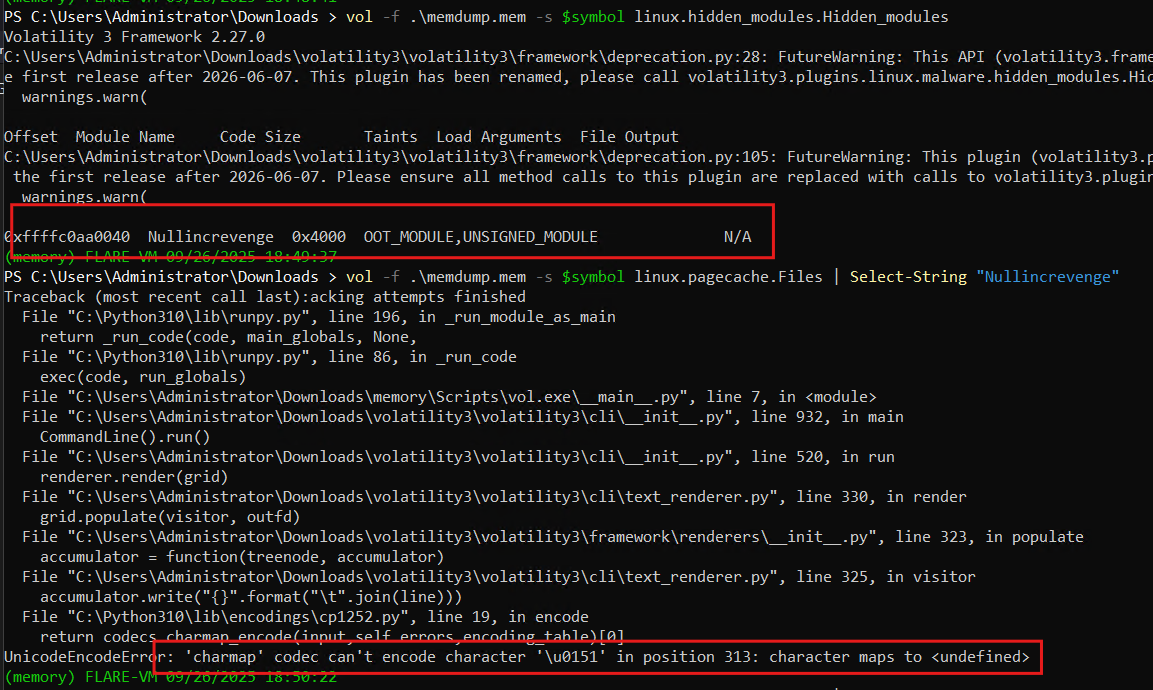
mindset:
If an attacker installed a kernel rootkit, it may be present only in memory or also persisted as a .ko file on disk. Running Volatility’s hidden modules check revealed an in-memory kernel object named Nullincrevenge
vol -f .\memdump.mem -s $symbol linux.hidden_modules.Hidden_modules
That flagged a suspicious, out-of-tree/unsigned module in RAM (strong rootkit indicator). To map that in-memory artifact to a file on disk, I enumerated recovered pagecache files and searched for the module name (forced UTF-8 output to avoid console encoding errors on Windows)
chcp 65001 > $null
[Console]::OutputEncoding = [System.Text.Encoding]::UTF8
$env:PYTHONIOENCODING = 'utf-8'
$env:PYTHONUTF8 = '1'

vol -f .\memdump.mem -s $symbol linux.pagecache.Files | Select-String "Nullincrevenge"
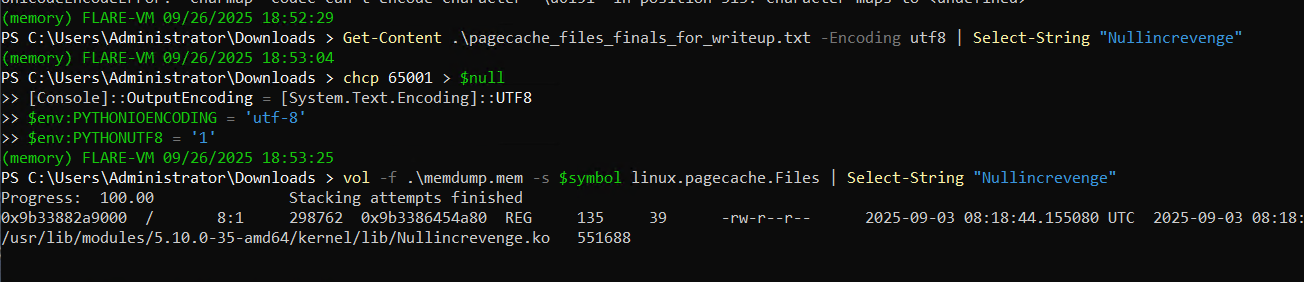
the malicious kernel object Nullincrevenge was present in memory and persisted on disk at /usr/lib/modules/5.10.0-35-amd64/kernel/lib/Nullincrevenge.ko
5. What is the email account of the alleged author of the malicious file? ( user@example.com )
Answer (short):
i-am-the@network.now
mindset:
opened that ko file, but it has bunch of ASCII control characters, which prints bytes. So we have to clean it and see what that file has. I used simple strings to clean it
command
$ko = "C:\Users\Administrator\Downloads\Outputs\recoverfs\92931307-c5fd-4804-94f2-a8287e677bd6\usr\lib\modules\5.10.0-35-amd64\kernel\lib\Nullincrevenge.ko"

..\..\strings.exe -n 4 $ko > Nullincrevenge_strings.txt
and there we go!

6. The next step in the attack involved issuing commands to modify the network settings and installing a new package. What is the name and PID of the package? (package name,PID)
Answer (short):
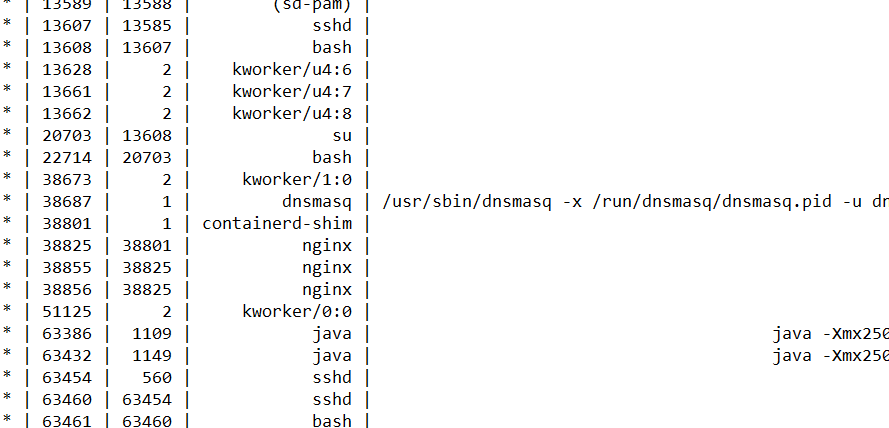
dnsmasq,38687
mindset:
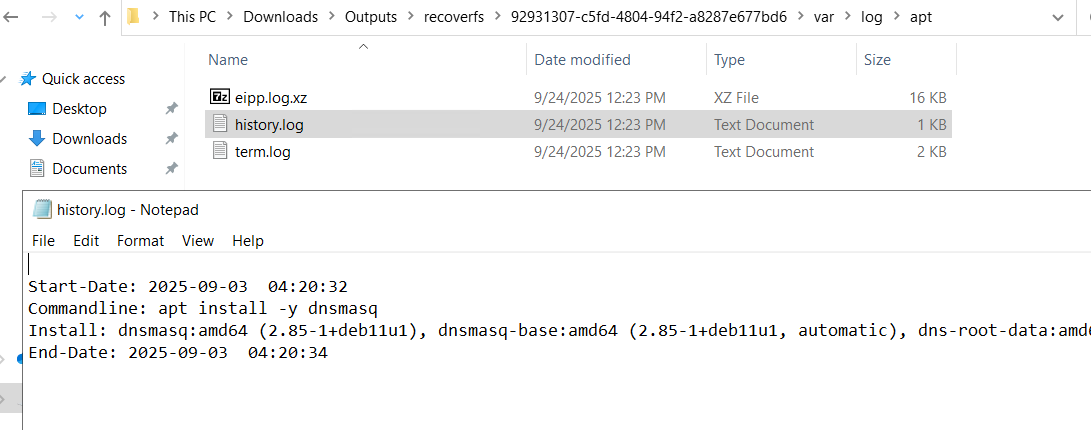
We already have the key clue in the bash history: the attacker ran apt install -y dnsmasq and then enabled/restarted the service. So the package name is almost certainly dnsmasq
and also if we /var/log/apt/history.log, we can see that it was downloaded
now I can check the psaux.txt which we had and get the pid from there
7. Clearly, the attacker’s goal is to impersonate the entire network. One workstation was already tricked and got its new malicious network configuration. What is the workstation’s hostname?
Answer (short):
Parallax-5-WS-3
mindset:
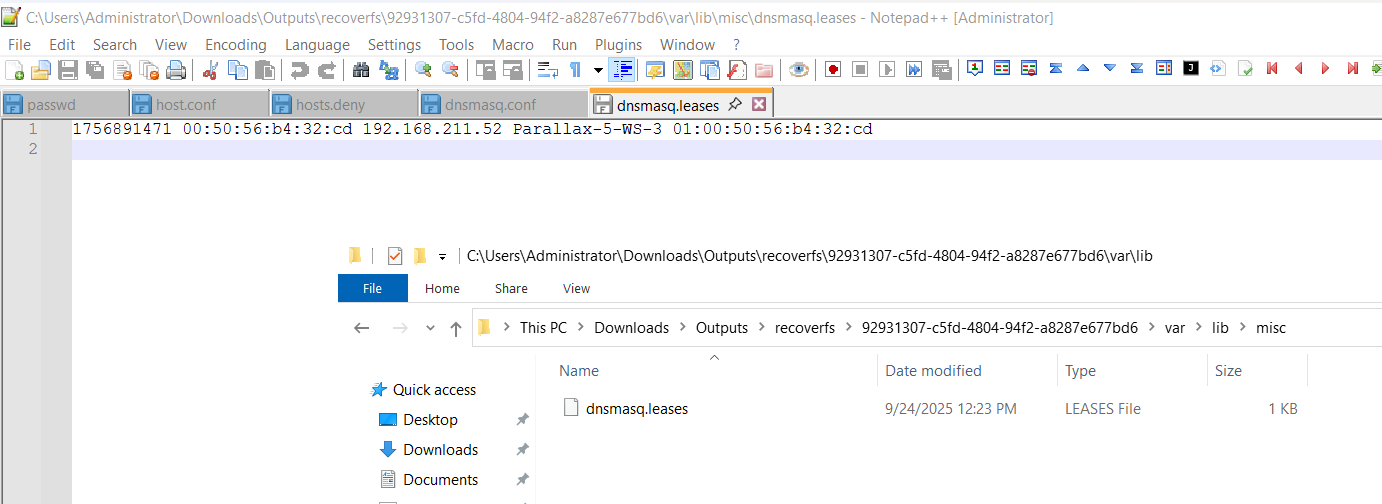
We know that dnsmasq was installed and serving DHCP/DNS. dnsmasq writes a line per lease: <expiry> <mac> <ip> <hostname> <clientid>. That directly contains the hostname the client reported during DHCP.
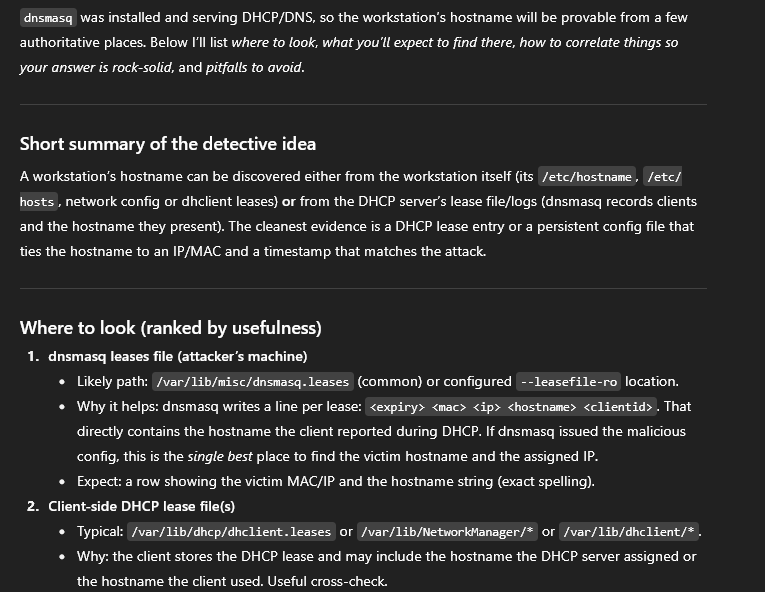
and I just followed GPT given things and found answer in the dnsmasq.leases
C:\Users\Administrator\Downloads\Outputs\recoverfs\92931307-c5fd-4804-94f2-a8287e677bd6\var\lib\misc\dnsmasq.leases
8. After receiving the new malicious network configuration, the user accessed the City of CogWork-1 internal portal from this workstation. What is their username? (string)
Answer (short):
mike.sullivan
mindset:
from someone else writeup
strings memdump.mem | grep -E '^POST /index.php HTTP/1.1$' -A 20
https://github.com/CleanCoderK/Holmes_CTF_2025_HTB/blob/main/05_The_Tunnel_Without_Walls.md
9. Finally, the user updated a software to the latest version, as suggested on the internal portal, and fell victim to a supply chain attack. From which Web endpoint was the update downloaded?
Answer (short):
/win10/update/CogSoftware/AetherDesk-v74-77.exe
mindset:
Now this question means a web request. So, we will find the answer in the log file somewhere
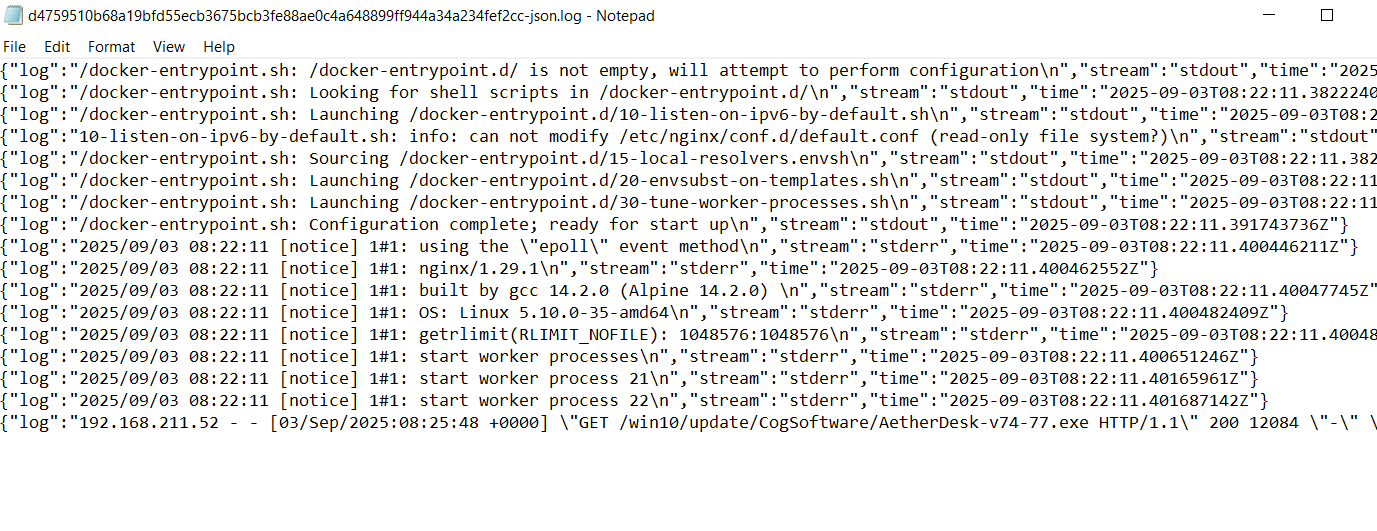
We saw that it was launched the portal via docker run earlier (from bash history and psaux); container stdout/stderr is captured by Docker and written to JSON log files on the host.
- Where to find (recovered FS):
/var/lib/docker/containers/<container-id>/<container-id>-json.log
(this was suggested from GPT)
- The container/nginx log shows a
GETfrom the compromised workstation IP (192.168.211.52) requesting exactly that path. (we know it from dnsmasq.leases) - The log entry returns
200 12084, which means the server served a 12,084-byte file successfully — it’s not just a probe, it downloaded a binary. - The User-Agent (
AetherDesk/... (Windows NT 10.0; Win64; x64)) indicates a client updater or the workstation itself requested that installer — matching the story that the user accepted an “update” via the portal.
Container log (2025-09-03T08:25:48Z): 192.168.211.52 - - [03/Sep/2025:08:25:48 +0000] "GET /win10/update/CogSoftware/AetherDesk-v74-77.exe HTTP/1.1" 200 12084 "-" "AetherDesk/73.0 (Windows NT 10.0; Win64; x64)" "-" (GET request)

dnsmasq.leases: 1756891471 00:50:56:b4:32:cd 192.168.211.52 Parallax-5-W3-3 01:00:50:56:b4:32:cd (dnsmasq.leases)

=> Download endpoint: /win10/update/CogSoftware/AetherDesk-v74-77.exe
10. To perform this attack, the attacker redirected the original update domain to a malicious one. Identify the original domain and the final redirect IP address and port. (domain,IP:port)
Answer (short):
updates.cogwork-1.net,13.62.49.86:7477
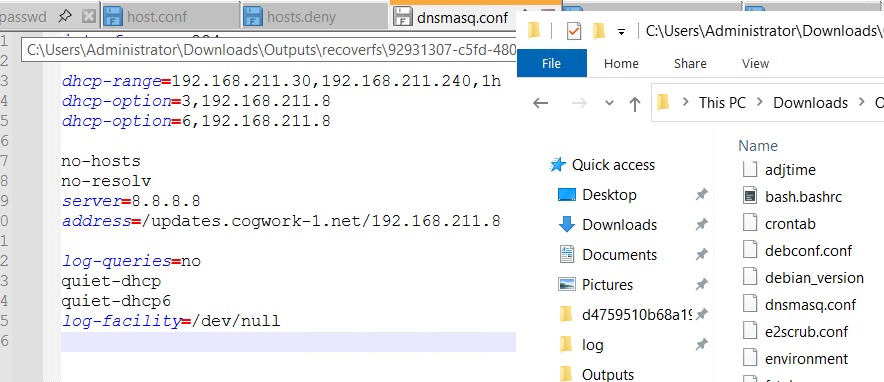
mindset:
As we know dnsmasq is involved, I checked dnsmasq.conf in the etc and question mentions about update domain, which we can see in the conf file of dnsmasq. So, we got the half answer.
updates.cogwork-1.net
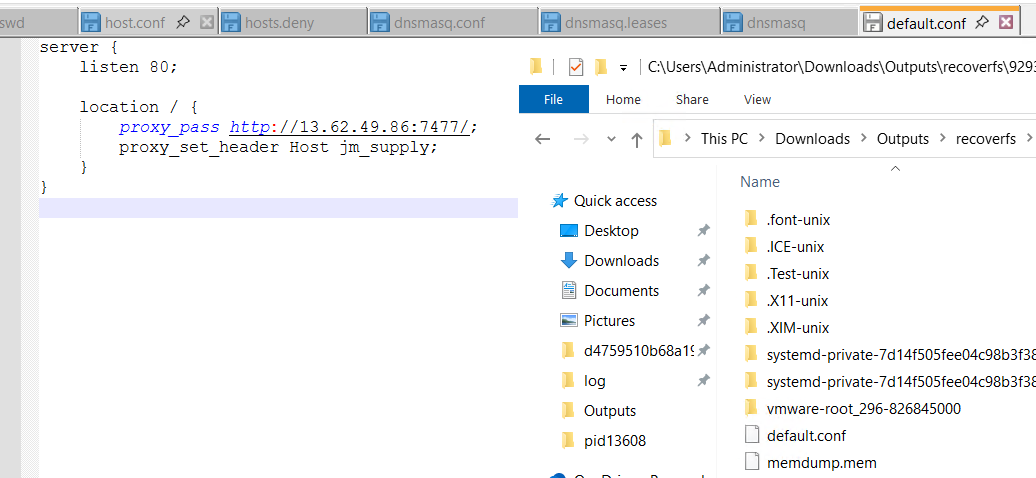
Then I randomly opened the default.conf I found in /tmp to check (another memory file is also here btw, but we are not even finding banner so I guess leave it)

We can see proxy_pass http://13.62.49.86:7477/ which tells that where the proxy forwarded requests (final IP:port)
And we already know about GET request made to update the file from previous question so it’s pretty much clear
So overall, attacker requested updates.cogwork-1.net (DNS), the proxy forwarded to 13.62.49.86:7477 (final target), and the logs prove the file was downloaded
Extras
Immediate (0–24h) recommended actions -prioritized
- Isolate the host from the network (network disconnect / power off if necessary) to stop DHCP/DNS poisoning and further distribution.
- Quarantine affected workstation(s) (Parallax-5-WS-3 and any other DHCP clients listed in
dnsmasq.leases). - Collect & preserve artifacts (memory dump,
/var/lib/docker/containers/*-json.log,/var/lib/misc/dnsmasq.leases, recoveredNullincrevenge.ko,apthistory.log) for forensic analysis and incident timeline. - Rotate credentials for impacted accounts (
jm,mike.sullivan, and any privileged accounts). Assume compromise and require MFA where possible. - Block network indicators — block IP
13.62.49.86and any attacker-controlled domains at perimeter/firewalls and DNS. - Revoke and reissue any TLS certs / API keys that may have been exposed or used during the attack.
Short-to-mid term recommendations
- Remove the malicious kernel module and any persistence mechanisms only after a full forensic image is captured
- Reimage the compromised host(s) and reinstall from trusted sources; do not reuse potentially compromised images.
- Harden SSH: disable password auth, enforce key-based auth, restrict allowed users, change default port if needed, and limit source addresses via firewall.
- Deploy or enforce endpoint detection/response (EDR) and network monitoring for anomalous DHCP/DNS activity, unusual process launches, and kernel module loading.
- Audit package sources and enforce signed packages; restrict apt sources and monitor
/var/log/apt/*for unexpected installs. - Conduct credential audit and enforce strong passwords + MFA organization-wide.
Longer-term strategic actions
- Implement network segmentation to limit DHCP/DNS impact across critical subnets.
- Deploy DNSSEC or internal DNS hardening; use authenticated DHCP or static assignments for critical assets.
- Build an incident playbook for supply-chain / update-server compromises and tabletop exercises.
- Review and improve pipeline for internal software updates (code signing, reproducible builds, pinned TLS trust).
What’s next and connect?
Few more sherlock writeups by me and HTB CDSA exam blog! Feel free to check it out and below are couple of ways to conect me!